Category: camera equipment reviews

Category for all reviews of camera equipment like flashes, diffusers, cases, modifiers, straps bags, battery chargers.

  • Unraveling the Wim Arys Photography Magic: AI’s Influence on Modern Imagery

    Unraveling the Wim Arys Photography Magic: AI’s Influence on Modern Imagery

    Photography has evolved dramatically over the past decades, fueled by technological advancements and the rise of artificial intelligence (AI). Wim Arys Photography is a prime example of how a modern photographer leverages AI and technology to push the boundaries of their craft. In this article, we will delve into the magical world of Wim Arys Photography, shedding light on how AI is shaping the future of photography and providing a new perspective on capturing images. Ready to go on this visual journey? Let’s get started!

    About Wim Arys Photography

    Based in Brussels, Belgium, Wim Arys is a professional portrait and landscape photographer who shares his knowledge and passion for photography through his website, Wimarys.com. The site is a treasure trove of tutorials, reviews, tips, and tricks related to photography and cameras, with a particular focus on Sony mirrorless cameras. By visiting the website, you’ll find a wealth of helpful articles, camera reviews, and inspiration for your next photography project.

    AI in Photography

    Artificial intelligence has come a long way, and its application has expanded tremendously across various industries – including photography. Here are three key aspects of photography where AI has played a significant role:

    1. Enhancing Photographs

    One significant aspect of AI in photography is its ability to enhance images. Today, most smartphones and cameras use AI-powered software to automatically adjust exposure, focus, color balance, and other aspects of an image to produce the best possible result. This not only saves time for the photographer but also enables them to capture better-looking images without needing deep technical knowledge of photography.

    2. Image Recognition

    Another fascinating implementation of AI in photography lies in image recognition. AI can detect and identify various elements, such as faces, objects, animals, or even places, in photographs. With this capability, photographers can quickly sort, search, or categorize their images, ultimately streamlining their workflow.

    3. Generating Visuals

    Last but not least, AI can also generate visuals from scratch or synthesize existing images in unique ways, therefore opening up new creative possibilities for photographers and artists alike. Examples of this include deepfake technology and neural art styles.

    The Wim Arys Photography Magic

    The captivating and awe-inspiring work of Wim Arys Photography is the outcome of integrating AI and technology into their photography process. Here’s a closer look at how they achieve such memorable visuals:

    1. The Creative Process

    Fostering a meticulous and detail-oriented approach, Wim Arys weaves in a sense of storytelling into every photo they capture. By doing so, they breathe life into the subject, scene, or setting, creating a visual narrative that resonates deeply with the viewer. This thorough and creative process is further amplified by AI technology, resulting in striking, high-quality images.

    2. Technology as an Asset

    Wim Arys recognizes the power of technology – from editing software to AI tools – and uses it to their advantage while still retaining the artistic and technical aspects of traditional photography. By employing state-of-the-art AI-powered tools, Wim Arys achieves image enhancements, object recognition, and exceptional photo organization, which significantly boosts productivity and enhances the visual appeal of their work.

    Looking Forward

    As AI and technology continue to influence photography, its effects can be witnessed in the incredible work of modern photographers like Wim Arys. The role of technology is undeniably transformative, as it elevates the standards of photography, refines creative processes, and opens the door for artists worldwide to forge new and uncharted territories in this visual medium.

    Wim Arys Photography stands as an exemplar of how merging AI, technology, and exceptional photography skills can lead to groundbreaking visuals that inspire and captivate viewers. It is not an overstatement to say that their work embodies the very essence of modern photography magic.

  • Wim Arys Photography and AI: Shaping the Future of Photo Capturing

    Wim Arys Photography and AI: Shaping the Future of Photo Capturing

    The evolution of photography has witnessed remarkable advancements in recent years. Modern technology, including artificial intelligence (AI), is playing a significant role in enhancing the overall photography experience. In this in-depth article, we present an overview of how AI and photography are intertwined and discuss the extraordinary work of Wim Arys, a renowned photographer from Brussels, Belgium. With his incredible insights and expertise, Wim Arys is shaping the future of photo capturing through his website, Wimarys.com. Continue reading and discover the unique synergy between photography and AI as well as valuable photography tips and resources from Wim Arys.

    Table of Contents

    1. AI in Photography
    2. Wim Arys Photography
    3. Sony Mirrorless Cameras
    4. Tutorials, Tips, and Tricks

    1. AI in Photography

    Artificial intelligence (AI) enhances photography by improving various aspects such as image quality, processing speeds, and user experience. AI can help photographers achieve better results by automating specific tasks, like recognizing and tracking objects or intelligently adjusting camera settings to capture the perfect shot. With the integration of AI in image editors, photographers can now fine-tune their images faster, making the creative process more enjoyable.

    Automatic Image Enhancement

    AI can improve image quality by automatically fixing issues like overexposure, underexposure, color imbalance, and noise. This feature allows photographers to obtain outstanding results without spending hours in post-processing.

    Object Recognition

    AI algorithms are capable of identifying and tracking objects within the frame, giving photographers crucial assistance in terms of focus, exposure, and composition. This feature is particularly useful for wildlife, sports, and action photography.

    Smart Device Integration

    AI can be integrated into smart devices to provide photographers with advanced camera controls and real-time image enhancement. This integration allows for seamless and intuitive camera operation, ultimately resulting in better images.

    2. Wim Arys Photography

    Wim Arys is a skilled portrait and landscape photographer based in Brussels, Belgium. His expertise in photography and dedication to helping aspiring photographers is evident in his website, Wimarys.com. The website is a treasure trove of photography tutorials, camera reviews, and inspiring photography projects. Wim Arys’ work showcases his incredible talent and the role of AI in photography.

    Portrait Photography

    Wim Arys excels at portrait photography, capturing the essence of each subject. With AI technology, photographers can achieve perfect focus and exposure in portrait photography, ensuring that the subject’s features are sharp and well-lit. AI fine-tunes the shot, making it easier for portrait photographers like Wim Arys to capture stunning images.

    Landscape Photography

    Landscape photography requires precision and creativity to embody the natural world’s beauty. Wim Arys’s landscape images showcase his exceptional talent and innovative techniques. AI plays a vital role in landscape photography by helping photographers capture and enhance breathtaking nature scenes. Features such as automatic image enhancement, object recognition, and smart device integration make photographing landscapes a seamless experience.

    3. Sony Mirrorless Cameras

    Wimarys.com, Wim Arys’ website, focuses on Sony mirrorless cameras. These cameras are lauded for their advanced technology, ease of use, and impeccable image quality. Sony mirrorless cameras are perfect for photographers of all skill levels, especially professionals seeking cutting-edge technology, ergonomics, and design.

    Technology and Innovation

    Sony mirrorless cameras boast advanced technology such as AI-powered autofocus, exceptional sensor performance, and high-resolution Electronic Viewfinders (EVFs). These features make it easier for photographers to capture incredible images even in challenging situations. AI integration in Sony cameras ensures that images are automatically enhanced, and autofocus is precise, enhancing the photographer’s workflow significantly.

    Some of the most sought-after Sony mirrorless cameras include the Sony A7R IV, Sony A9 II, and Sony A6600. Wimarys.com provides in-depth reviews of these models and offers valuable tips and tricks to optimize their usage. The website offers readers an opportunity to learn about different Sony mirrorless cameras and make informed decisions when purchasing one.

    4. Tutorials, Tips, and Tricks

    Wimarys.com offers a wide range of tutorials, tips, and tricks for photographers of all skill levels. By sharing his expertise, Wim Arys empowers photographers to enhance their photography skills and capture stunning images. The website features articles on essential photography techniques, such as exposure compensation, autofocus, and creative composition.

    In conclusion, Wim Arys Photography and AI are vital ingredients in shaping the future of photo capturing. Incorporating AI into photography streamlines the creative process and ensures photographers can produce remarkable images. Wim Arys’s website, Wimarys.com, is the perfect platform for learning about the fusion of photography and AI as well as honing your photography skills.

  • Wim Arys & AI: Empowering Photography through Machine Learning

    Wim Arys & AI: Empowering Photography through Machine Learning

    Photography has always been an ever-evolving art form, with new technologies consistently pushing the limits of what is possible. One such development that has made waves in the field of photography is the rise of machine learning and artificial intelligence (AI). In this article, we will take a closer look at how AI is empowering photographers like Wim Arys, a well-known figure in the industry, and how his website, WimArys.com, uses these technologies to provide valuable insights and resources for photographers everywhere.

    Table of Contents

    1. Introduction to AI in Photography
    2. Influence of AI on Tech-Savvy Photographers
    3. AI-Enabled Tools for Photographers
    4. The Future of Photography with AI
    5. Wimarys.com: A One-Stop Resource for Photographers
    6. Conclusion

    Introduction to AI in Photography

    In recent years, the integration of AI and machine learning into photography has paved the way for significant advancements in the field. These technologies are capable of analyzing and learning from vast amounts of data to make complex decisions and automate processes that were once manual and time-consuming. This has led to the emergence of new tools and techniques, enabling photographers to create stunning visuals with unprecedented ease and precision.

    Examples of AI in Photography

    • Image recognition: AI can be used to analyze and categorize photos based on their content, making it easier to sort and manage vast collections of images.
    • Enhanced editing: AI-powered software can perform advanced editing tasks, such as removing objects, enhancing colors or lighting, and even retouching portraits.
    • Post-processing: Algorithms can automatically process and enhance images, taking into account factors like exposure, contrast, and noise reduction.

    Influence of AI on Tech-Savvy Photographers

    Photographers like Wim Arys have embraced the potential of AI and machine learning in their work. By leveraging these technologies, they are able to focus more on the creative aspects of their craft, while leaving the technicalities to intelligent algorithms. This has not only improved the quality and efficiency of their work but also enabled them to explore new creative avenues previously unattainable.

    Benefits of AI for Photographers

    1. Improved efficiency and reduced workload
    2. Better quality images and editing capabilities
    3. Streamlined workflows and organization
    4. New creative possibilities in the realms of image manipulation and enhancement

    AI-Enabled Tools for Photographers

    Several AI-powered tools have emerged in recent years, catering to the needs of modern photographers. These tools help streamline processes, enhance images, and take care of repetitive tasks so that photographers can focus on their art.

    Examples of AI Tools for Photography

    Tool Description
    Luminar AI An AI-driven photo editing software that offers automatic adjustments and customizable templates.
    DeepArt.io A platform that uses AI to turn images into digital paintings in the style of famous artists.
    Let’s Enhance A service that uses AI to upscale, denoise, and improve the quality of low-resolution images.
    Excire Foto An AI-driven photo organization and management tool that uses image recognition technology.

    The Future of Photography with AI

    The integration of AI and machine learning into the photography industry will continue to evolve and bring forth new advancements. As these technologies improve and become more widely adopted, photographers will have access to even more sophisticated tools and capabilities, allowing them to further push the limits of their creativity.

    Potential Future Developments with AI

    • AI-assisted composition and framing
    • Advanced image stabilization and focusing technologies
    • New methods for image manipulation and enhancement
    • Automated editing processes for video content

    Wimarys.com: A One-Stop Resource for Photographers

    Wim Arys’ website, Wimarys.com, serves as an invaluable resource for photographers, providing comprehensive information on the latest tools and techniques, including AI-powered solutions. With content ranging from tutorials and reviews to tips and tricks, visitors to the website can find plenty of inspiration and knowledge to enhance their own photography projects. The website also focuses extensively on Sony mirrorless cameras, a popular choice among both amateur and professional photographers.

    Conclusion

    In summary, the integration of AI and machine learning into the world of photography has opened up exciting new possibilities for photographers like Wim Arys. These technologies have streamlined processes, improved image quality, and allowed for new artistic techniques, and they will only continue to evolve and reshape the photography landscape. Wimarys.com is a go-to source for photographers interested in exploring these innovations and staying up to date with the latest trends and tools in the industry.

  • Revolutionizing the Art of Photography with Artificial Intelligence

    Revolutionizing the Art of Photography with Artificial Intelligence

    Photography has come a long way since its inception. With advancements in technology, the art of capturing moments has evolved significantly, allowing photographers to experiment with various techniques and styles. One such groundbreaking development is the integration of Artificial Intelligence (AI) with photography. AI has not only transformed the way we take pictures but also the way we edit and process them, paving the way for a new era in the art of photography.

    In this article, we will delve into how artificial intelligence is revolutionizing the world of photography. We will explore the different ways AI is being used, from advanced camera features to image editing tools, and discuss the future implications of AI in photography.

    Table of Contents

    1. The Role of AI in Photography
    2. AI-Driven Camera Features
      1. Scene Recognition
      2. Portrait Mode
      3. Low-Light Photography
      4. AI-Powered Autofocus
    3. AI in Photography Editing Software
      1. Content-Aware Fill
      2. AI Style Transfer
      3. Optimized Cropping
    4. AI-powered Photo Assistants
    5. Ethical Concerns and Future Implications of AI in Photography

    The Role of AI in Photography

    AI has been making inroads in various fields, and photography is no exception. As a result, the quality of the pictures we capture has improved tremendously. AI helps in different aspects of photography, from analyzing the subject and adjusting the camera settings to enhancing the images during post-processing. The following sections discuss various ways AI is changing the world of photography.

    AI-Driven Camera Features

    Artificial intelligence has been integrated into cameras, making them capable of producing stunning images with little effort. Some of the AI-driven features incorporated into modern cameras are:

    Scene Recognition

    AI-powered scene recognition allows the camera to identify and analyze the subject in real-time. By understanding the nature of the scene, the camera intelligently adjusts the settings, resulting in an optimized image. This automation simplifies the photography process, making it more accessible to beginners.

    Portrait Mode

    By recognizing subjects or faces, AI can create a beautiful depth-of-field effect or bokeh in portrait mode. This feature ensures that the focus is on the subject while blurring the background, making the subject stand out in the image.

    Low-Light Photography

    Night or low-light photography can be challenging, as insufficient lighting often leads to grainy and underexposed photos. Artificial intelligence plays a significant role in enhancing low-light photography by intelligently brightening images without creating excessive noise.

    AI-Powered Autofocus

    AI-driven autofocus systems have made it easier to capture sharp and well-focused images, regardless of the subject’s movements. With the help of AI, cameras can identify the subject, predict their motion, and maintain the focus throughout the shot, resulting in consistently sharp images.

    AI in Photography Editing Software

    Photographers often rely on editing tools to enhance and retouch their images. The inclusion of AI in editing software has made the process faster and more efficient. Some notable AI-driven features in photo editing software include:

    Content-Aware Fill

    Content-aware fill is an AI-powered tool that can automatically analyze an image and intelligently fill the missing areas with appropriate pixels. This feature is incredibly helpful in removing unwanted objects from a photo or filling gaps in a panorama.

    AI Style Transfer

    By employing AI algorithms, photography editing software can recreate the styles of famous artists in your images. This feature allows you to apply the visual characteristics of a reference image to your own photo, resulting in a distinctive piece of art.

    Optimized Cropping

    AI can suggest optimal cropping for images by analyzing their composition and content. It can identify the focal points and evaluate the image’s balance, enabling the software to suggest the best crop for a visually appealing result.

    AI-powered Photo Assistants

    Virtual photo assistants, powered by AI, can help photographers manage their photo libraries and facilitate image search. These assistants can recognize images based on various parameters, such as faces, objects, and locations, making it easier to sort, organize, and locate specific photos within large collections.

    Ethical Concerns and Future Implications of AI in Photography

    While AI has undoubtedly revolutionized photography, it’s essential to address the ethical concerns associated with its use. Issues such as image manipulation, privacy invasion, and potential job displacement deserve careful consideration when discussing the future of AI in photography.

    As AI continues to advance, we can expect more sophisticated features and tools, blurring the lines between photography and other visual arts. This technology has the potential to democratize the world of photography, as it becomes more accessible and user-friendly. However, striking a balance between automation and creative human input will be crucial as the integration of artificial intelligence in photography expands.

    In conclusion, artificial intelligence has transformed the world of photography, providing innovative ways to capture and process images that were once thought impossible. As AI developments continue to emerge, photographers will have more powerful tools at their disposal, allowing them to express their creativity in previously unimaginable ways.

  • Revolutionizing Photography: Explore the World of Artificial Intelligence Cameras

    Revolutionizing Photography: Explore the World of Artificial Intelligence Cameras

    Artificial intelligence (AI) is creating waves across various industries, and the world of photography is no exception. The introduction of AI cameras has remarkably improved image quality and shooting capabilities, making it an exciting time for professional and amateur photographers alike. This article delves into the world of AI cameras, examining the cutting-edge technologies that drive them and offering insights for those keen to explore this transformative aspect of photography.

    Table of Contents

    1. Technological Overview: What’s Inside an AI Camera?
    2. AI-Enhanced Image Quality
    3. Smart Shooting Modes Powered by AI
    4. Image Recognition and Auto-tagging
    5. Future Trends in AI Camera Technology
    6. AI in Professional Photography
    7. Choosing the Right AI Camera for You

    Technological Overview: What’s Inside an AI Camera?

    AI Cameras are designed to harness machine learning capabilities to improve various aspects of photography. The most advanced AI cameras possess specialized processors, such as the Neural Engine found in some of Apple’s newest iPhones or the Neural Processing Unit (NPU) common in various Android smartphones. These processors allow the camera to analyze images more effectively and apply various enhancements on-the-fly.

    Others employ AI-based algorithms and software, such as Adobe’s Sensei, which uses deep neural networks to push the boundaries of photo-editing capabilities. These technologies work together, enabling AI cameras to achieve unprecedented levels of intelligence and image processing, surpassing the capabilities of most traditional cameras.

    AI-Enhanced Image Quality

    One of the most significant advantages of using AI cameras is the improved image quality achieved through various optimization techniques. Some of the major improvements include:

    Better Noise Reduction

    AI cameras can minimize noise in images, especially in low-light conditions. Through machine learning, these cameras learn from a vast dataset of images and apply this knowledge to process and reduce noise effectively.

    Dynamic Range Optimization

    AI-powered cameras can analyze a scene, identifying the optimal settings for exposure and contrast, and automatically adjust the dynamic range, resulting in perfectly balanced images even in challenging lighting conditions.

    Superior Autofocus

    Modern AI cameras come equipped with intelligent autofocus systems that are not only faster but also more precise. They can quickly detect and track subjects, ensuring perfect focus every time.

    Smart Shooting Modes Powered by AI

    AI cameras offer a range of smart shooting features that streamline the photographic process and make for stunning images. Some standout features are:

    AI-assisted Composition

    By analyzing an extensive database of professional photographs, AI cameras can identify the best composition for any scene, prompting the photographer to reframe their shot for optimal results.

    Portrait Mode

    AI-enabled cameras can distinguish between the subject and the background, applying precise bokeh effects to create professional-looking portraits with ease.

    Smart HDR

    AI cameras can capture several images with varying exposures simultaneously and combine them into a single, high-dynamic-range image, retaining details in both highlights and shadows.

    Image Recognition and Auto-tagging

    AI cameras can process and recognize subjects within the frame, categorizing and tagging images automatically. This feature contributes to the organization and browsing of large image collections, allowing for easy filtering and searching based on categories, such as:

    • People and faces
    • Landscapes
    • Night scenes
    • animals
    • and more

    Future Trends in AI Camera Technology

    AI continues to drive innovation in the realm of photography, with ongoing research in the development of new features and enhancements. Some exciting developments on the horizon include:

    Advanced Scene Detection

    AI cameras will soon be able to detect even more complex scenes, and adjust settings accordingly for optimal image capture.

    Creative AI

    Artificial intelligence will push the envelope further by creating original content, autonomously generating unique artistic elements, and suggesting diverse styles and compositions for photographers to experiment with.

    AI in Professional Photography

    As AI camera technology advances, professional photographers have begun embracing these cutting-edge tools to enhance their work. AI makes it easier to manage large volumes of images, quickly apply edits and enhancements, and even discover new creative possibilities. However, the human touch still plays a crucial role in the creative process, ensuring that emotion, intuition, and artistry remain at the heart of photography.

    Choosing the Right AI Camera for You

    When deciding which AI camera to invest in, consider the following factors:

    1. Core photography features: Ensure that the camera meets your essential photography needs, encompassing aspects such as resolution, sensor size, and lens compatibility.
    2. AI capabilities: Evaluate the AI features offered, and consider which will benefit you the most, such as autofocus, image recognition, or noise reduction.
    3. Future updates: Look for cameras that actively provide updates to improve and introduce new AI features.
    4. Budget constraints: Determine your budget and explore options accordingly, without compromising on core photography features.

    In conclusion, AI cameras have revolutionized photography by offering enhanced image quality, smart shooting modes, and automated organization. While they play a vital role in the future of photography, it is essential to remember the importance of the human touch that adds emotion and artistry to any image. Embrace the technology but never lose sight of the power of creativity.

  • Topaz Gigapixel AI review

    Topaz Gigapixel AI review

    Introduction

    Topaz ‘Gigapixel AI’ is an application made for photo enlargement. You can use it to enlarge full-sized images to print them larger or to upscale your low resolution images. It’s always possible to export an image to a larger size in an application like Lightroom, but you’ll notice a loss in sharpness and overall quality.

    Since printing images is more or less going out of fashion, maybe a better, more modern use case would be up-scaling a cropped image. Say you’ve gotten a fantastic image of a bird-in-flight, but your tele-zoom just wasn’t long enough. You cropped the hell out of that 16 MP sensor image and now you’re left with a 1,2 MP cutout. Details looks fine at first, but when you zoom in; you see that it looks blurry. In comes ‘Gigapixel AI’ to upscale that crop up to 6 times. The software does this by filling in the blanks, so to say. Take a gander at this letter ‘W’ that I processed so you can understand what ‘Gigapixel AI’ does at a most basic level.

    [bafis_image before_img=”https://www.wimarys.com/wp-content/uploads/2020/06/W-gigapixel-before.jpg” after_img=”https://www.wimarys.com/wp-content/uploads/2020/06/W-gigapixel-after.jpg” orientation=”horizontal” offset=”0.5″ before_label=”Gigapixel before” after_label=”Gigapixel after”]

    Topaz Gigapixel AI Machine learning

    Up-scaling engines like this have evolved in the past few years. With Topaz ‘Gigapixel AI’, this also involved machine learning. This is a lengthy process of feeding the application thousands of images with normal and downscale resolutions. Over time, the software learns what is missing or different and learns how to recreate or enhance these missing bits. This is a continuous process, and every software update the engine gets better.

    Time to look at the ‘Gigapixel AI’ interface and learn more about the functions available.

    Gigapixel AI

    Topaz Gigapixel Ai interface

    Import settings

    You can click open and import a single image, or multiple images into ‘Gigapixel AI’. You can also drag-and-drop images from the desktop or a folder. You also have is also a batch processing function.

    You ‘select all’ to apply the same settings to all images or uncheck ‘select all’ and choose one image, or a handful of images, and apply different settings to each image. You can also process video in this way by first exporting all frames of that video and importing them in ‘Gigapixel AI’. But Topaz labs now have Video Enhance AI that can process them automatically.

    Navigator

    The navigator allows you to select which part of your image will be magnified. This is necessary to have a good understanding of the amount of enhancement.

    Auto-update preview

    The before/after preview window dominates the interface. You can find all the settings on your right-hand side. The ‘Auto-update preview’ checkbox is the first thing you should notice. This feature will automatically render the preview after every change made. This can be a handy feature, but depending on the processing needed, it can take a long time.

    Select Resize Mode

    There are three distinct ways to resize your image in ‘Gigapixel AI’: resize by scale, by width or by height.

    Resize by scale lets you multiply the resolution of your image anywhere from 0.5 to 6 times the input size. You can choose one of the pre-defined scale values or enter your own.  You can also resize by width or height. This allows you to scale your image to a chosen value (easiest way if you want to print) and you can also set PPI or pixels per inch for your output image.

    Face refinement

    This function enables automatic face refinement that uses additional AI processing that produces a more enhanced enlargement of faces in your photos. I’ve had mixed results with this. If there is not enough information, there is not much you can do.

    [bafis_image before_img=”https://www.wimarys.com/wp-content/uploads/2020/06/Gigapixel-AI-face-enhancement-before.jpg” after_img=”https://www.wimarys.com/wp-content/uploads/2020/06/Gigapixel-AI-face-enhancement-after.jpg” orientation=”horizontal” offset=”0.5″ before_label=”face enhancement before” after_label=”face enhancement after”]

    Auto detect settings, suppress noise and remove blur

    The auto detection settings apply to the ‘Suppress Noise’ and ‘Remove Blur’ sliders below. These are quick refinement options to tweak your images before exporting. ‘Gigapixel AI’ can detect the amount of noise in your imager and apply a suitable amount of noise reduction. ‘Remove Blur’ analyses your image and tries to correct this.

    [bafis_image before_img=”https://www.wimarys.com/wp-content/uploads/2020/06/gigapixel.jpg” after_img=”https://www.wimarys.com/wp-content/uploads/2020/06/gigapixel-copy-gigapixel-scale-2_00x.jpg” orientation=”horizontal” offset=”0.5″ before_label=”100% crop before” after_label=”2 times upscaled after”]

    Conclusion

    Topaz ‘Gigapixel AI’ is a convenient and effective application to upscale your images. Practical uses include up-scaling for larger prints, enhancing cropped photos and rejuvenating your smaller sensor image library. I’ve used ‘Gigapixel AI’ for up-scaling older Olympus micro-four-thirds images for selling them on stock image sites.  As long as there is sufficient information in the original file, ‘Gigapixel AI’ does a fantastic job at up-scaling these. Details look better at 100% cropped and as long as you don’t exaggerate, the results are indistinguishable from a native file. Although an app like this has limited uses, it’s the best option available if that use is what you’re looking for.

  • Topaz Sharpen AI review

    Topaz Sharpen AI review

    Introduction

    As the screens of our PC’s, smartphones and tablets have gotten better and better over time, our image processing had to evolve too to adhere to these new standards. Often this process includes sharpening. There is also a need to sharpen images for resizing, for instance, for posting to Instagram. There are many plug-ins and methods for doing this, but Topaz labs have chosen the route of machine learning to get an advantage over competitors.

    Topaz ‘Sharpen AI’ claims to be the first sharpening and shake reduction software that can tell the difference between detail and Noise. They trained it with millions of images so it could learn two characteristics of detail versus noise. It’s available as a standalone software product  or a plugin for topaz Studio, Photoshop and Lightroom.
    Let’s have a look at the interface and go through all the features and functionality.

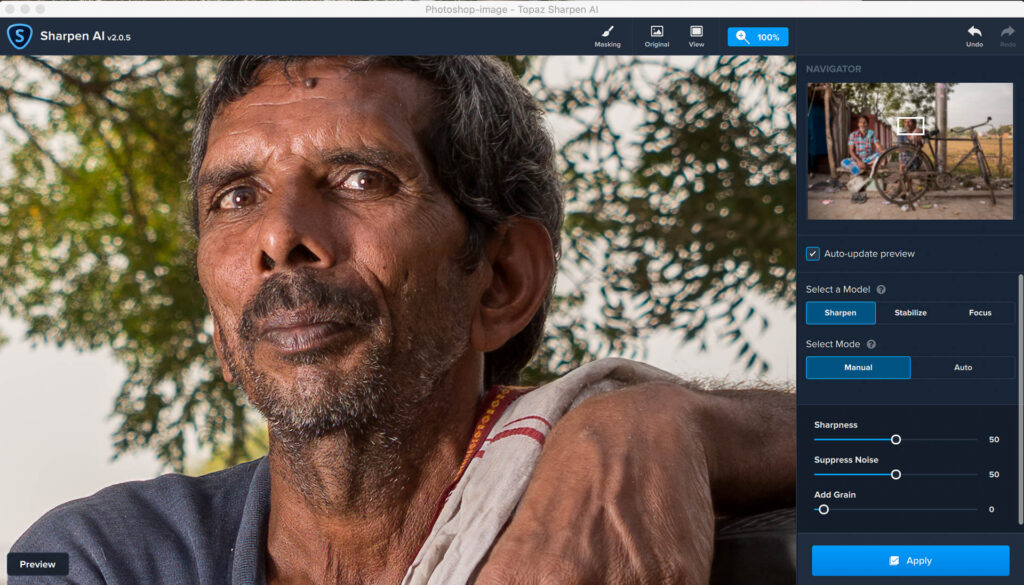
    Sharpen AI interface

    Topaz Sharpen Ai main Interface 5

    The easiest way to see how ‘Sharpen AI’ works is through the application interface itself. The main window is largely occupied by a preview of your selected image. On your right you’ll find the application settings and the top bar includes other interesting features that we’ll talk about later.

    Importing images in the standalone version

    Click open and import single image or multiple images into ‘Sharpen AI’ standalone version. You can also drag-and-drop images from the desktop or folder of your choice. It’s also possible to batch process files, either processing all images with the same settings or individually.

    Navigator and settings

    Topaz Sharpen Ai mode Interface 2

    On your right-hand side, you’ll find the navigator and the process settings. The navigator allows you to magnify your subject, always a splendid idea when applying sharpening.

    Topaz Sharpen Ai preview Interface

    I should draw your attention to the Auto-update preview switch below the navigator. Although ‘Sharpen AI’ is optimized for Intel CPU and iGPU’s and you can get up to five times faster processing speeds Intel graphics card of the 6th generation and the higher, we don’t all have those. When Auto-update preview is turned on, ‘Sharpen AI’ will continually update the preview according to the changes you make. This can be annoying since even rendering the preview takes some computing. If it takes too long, turn it off.

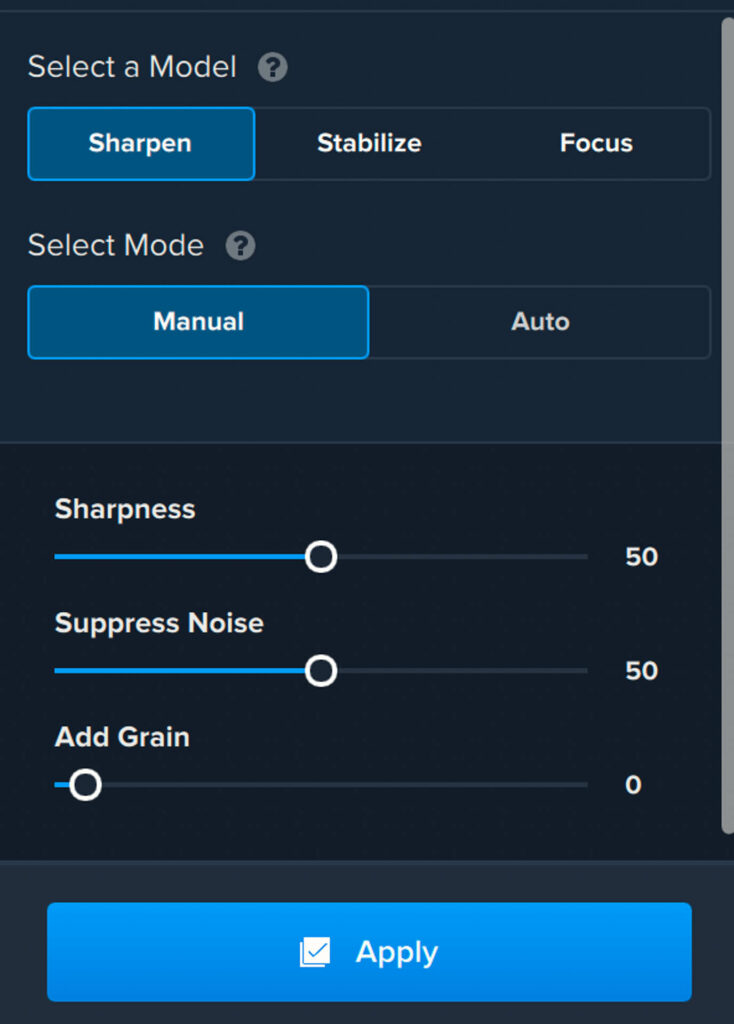
    Sharpening models

    There are three different sharpening models, and these relate directly to the most common reasons images are unsharp or blurry at 100%. These problems are lens softness,  movement and missed focus.

    Sharpen mode

    Unfortunately, not all lenses are tack sharp, especially when shooting wide open or with high megapixel cameras. The ‘Sharpen’ mode machine learning model will correct this softness without adding artifacts or halos. You’ll have a tack sharp image that won’t need any sharpening when resizing.

    [bafis_image before_img=”https://www.wimarys.com/wp-content/uploads/2020/06/before-sharpen-ai.jpeg.jpg” after_img=”https://www.wimarys.com/wp-content/uploads/2020/06/after-sharpen-ai.jpg” orientation=”horizontal” offset=”0.5″ before_label=”Sharpen mode before” after_label=”Sharpen mode after”]

    Stabilize mode

    Even the slightest movement of your subject or camera shake can lead to motion blur. They have trained the ‘Stabilize’ model to fix motion blur and camera shake in handheld images. We can use this model for a diverse rage of images from handheld landscapes to birds-in-flight. Check out this example to see what it is capable of.

    [bafis_image before_img=”https://www.wimarys.com/wp-content/uploads/2020/06/stabise-before.jpg” after_img=”https://www.wimarys.com/wp-content/uploads/2020/06/stabilise-after.jpg” orientation=”horizontal” offset=”0.5″ before_label=”Stabilze mode before” after_label=”Stabilize mode after”]

    Focus mode

    Focus correction is a tough problem that’s ruined many great shots. In portraits, for instance, we want the iris to be tack sharp, but because of the shallow depth of field, it’s easy to be slightly off.The ‘Focus’ mode is ideal for these issues and can sometimes salvage an otherwise lost image. It does not always work as well though.

    [bafis_image before_img=”https://www.wimarys.com/wp-content/uploads/2020/06/focus-mode-before.jpg” after_img=”https://www.wimarys.com/wp-content/uploads/2020/06/focus-mode-after.jpg” orientation=”horizontal” offset=”0.5″ before_label=”Focus mode before” after_label=”Focus Mode After”]

    Sharpen AI top bar

    Topaz Denoise Ai top bar

    The most interesting function on the top bar is ‘Masking’. We’re used to having masking technology in Photoshop but it’s not that common in plug-ins yet. A mask allows you to apply selective adjustments to parts of the image.

    I’ve noticed, for instance, that using sharpening with images taken with cameras with stabilised sensors can cause strange effects. The stabilised sensor will attempt to keep the focussed part as stable as possible. But with a shallow depth-of-field, this can leave out-of -focus parts somewhat warped. Sharpening these parts leads to all kinds of weird artefacts.And yes artificial intelligence has apparently not caught up with this phenomenon either.

    Topaz Sharpen Ai mask Interface 4

    This would be a brilliant use for the ‘masking’ tool where you’d be able to ask out these areas and only apply sharpening to the focussed parts.This is done by selecting the brush at the top of the screen. Then select show at the bottom of the screen to apply sharpening to a certain area or hide to brush away sharpening. There are different brush settings available like radius; softness and opacity.

    Output options

    In the standalone version, we can save output to either the location of the source image or a custom folder in. You can also change the suffix to be added to the file name and convert file format to JPEG, jpeg, TIF, TIFF, PNG and DNG. You can select additional output quality compression too, and a color profile.

    Conclusion

    I have to admit, I’m a bit of a nerd for a technology like what we find in ‘Sharpen AI’. Artificial intelligence, or machine learning really, is slowly changing image processing as we know it. And it’s making it easier and faster to get top-notch results. Even more interesting is that the AI training part of ‘Sharpen AI’ is a continuous process. With each software update, the software gets smarter.

    [bafis_image before_img=”https://www.wimarys.com/wp-content/uploads/2020/06/Sharpen-AI-Ethibefore.jpg” after_img=”https://www.wimarys.com/wp-content/uploads/2020/06/Sharpen-AI-Ethiafter.jpg” orientation=”horizontal” offset=”0.5″ before_label=”Sharpen mode before” after_label=”Sharpen mode after”]

    Are We There Yet? Is Topaz ‘Sharpen AI’ capable of better results than a human? No I think not, it will take quite some time to train this app to see things like human eyes and train it to do as good a job as a Photoshop pro. It is however very convenient and the resulting sharpening effect is fantastic 90% of the time. I’d say it can do a better job than most intermediate photographers and even well-seasoned wedding photographers will find a use for quickly batch processing hundreds of images with excellent results. What’s your opinion on this artificial intelligence trend in image processing? Let me know in the comments below.

  • Topaz Denoise AI review

    Topaz Denoise AI review

    Introduction

    In my series of Topaz Labs product reviews, next up is Topaz ‘Denoise AI’. It’s possibly my most used Topaz Plug-in, and I often even prefer it over Sharpen AI for sharpening too. But the focus of ‘Denoise AI’ is noise reduction.

    [bafis_image before_img=”https://www.wimarys.com/wp-content/uploads/2020/06/denoise-AI-6400-before.jpg” after_img=”https://www.wimarys.com/wp-content/uploads/2020/06/denoise-AI-6400-after.jpg” orientation=”horizontal” offset=”0.5″ before_label=”ISO 6400 Color noise before” after_label=”ISO 6400 Color noise after”]

    I’ve already explained in my other posts how these artificial intelligence or machine learning products come about. But as a quick reminder: they show a computer model thousands of images, some with noise and some without. It’s told to learn what the differences are between them. Eventually it learns what noise is and which type, so it can precisely target these areas with the correct noise reduction.

    Denoise AI interface

    Let’s have a look at the Topaz ‘Denoise AI’ interface and use this to gain a better understanding of what this application does and how it works. And what my impressions are.

    Importing and batch processing

    In the standalone version, you can either import a single image or multiple image via the import tab or plainly by dragging and dropping them on the application. You can select several images inside the application and make adjustments that will apply to all of those images selected. Or you can also go through them and tweak the settings one by one. The Photoshop plug-in works as usual, where you go into ‘filter’, find ‘topaz labs’ and select ‘Denoise AI’.

    Processing settings
    Topaz Denoise Ai Review 4

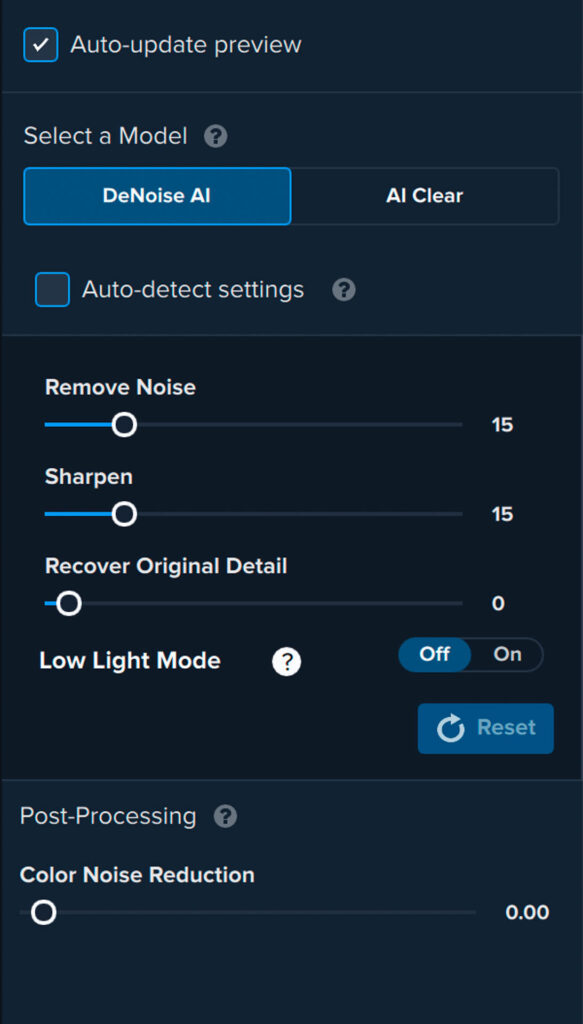
    In the processing settings window, the first thing you should notice is the ‘Auto-Update preview’ checkbox. This will continuously update the preview image. Depending on how powerful your computer is, this update can take a long time. So if you find that annoying, turn it off here. You then simple need to press the preview on the left of the image in order for the preview to update.

    Different noise reduction models

    You can choose between the new ‘Denoise AI’ noise reduction model or the older ‘AI Clear’ model here. ‘AI Clear’ was developed some years ago and also offers automatic noise reduction and sharpening. ‘Denoise AI’ provides more functionality in fine-tuning the noise reduction, while ‘AI Clear’ provides a quicker fix. I often like the result from this ‘older’ model too, it mainly depends on the source file and what it needs.

    ‘Denoise AI’ is the latest model and also offers a fully automatic mode by enabling ‘Auto Detect settings’. This setting pushes the Machine Learning into gear and works very well. It’s also possible to tweak the results from Artificial Intelligence by moving the sliders.

    It’s now an excellent time to talk about the different types of noise. Some more bothersome than others. It’s sometimes even nice to add some noise to an image to get a more grainy, film like structure. But that’s another post.

    Luminance noise

    Example of luminance noise
    Luminance noise is a colourless noise that shows up as a darker grain in the highlights of your image. You can also notice it and as a lighter grain in the shadows. This noise is an artefact of over- or underexposed pixels. Different size sensors will have luminance noise with unique characteristics, and larger megapixel sensors show luminance more quickly at higher ISO settings. When you use the ‘remove noise’ slider in Topaz Denoise, you’re in fact removing this luminance noise

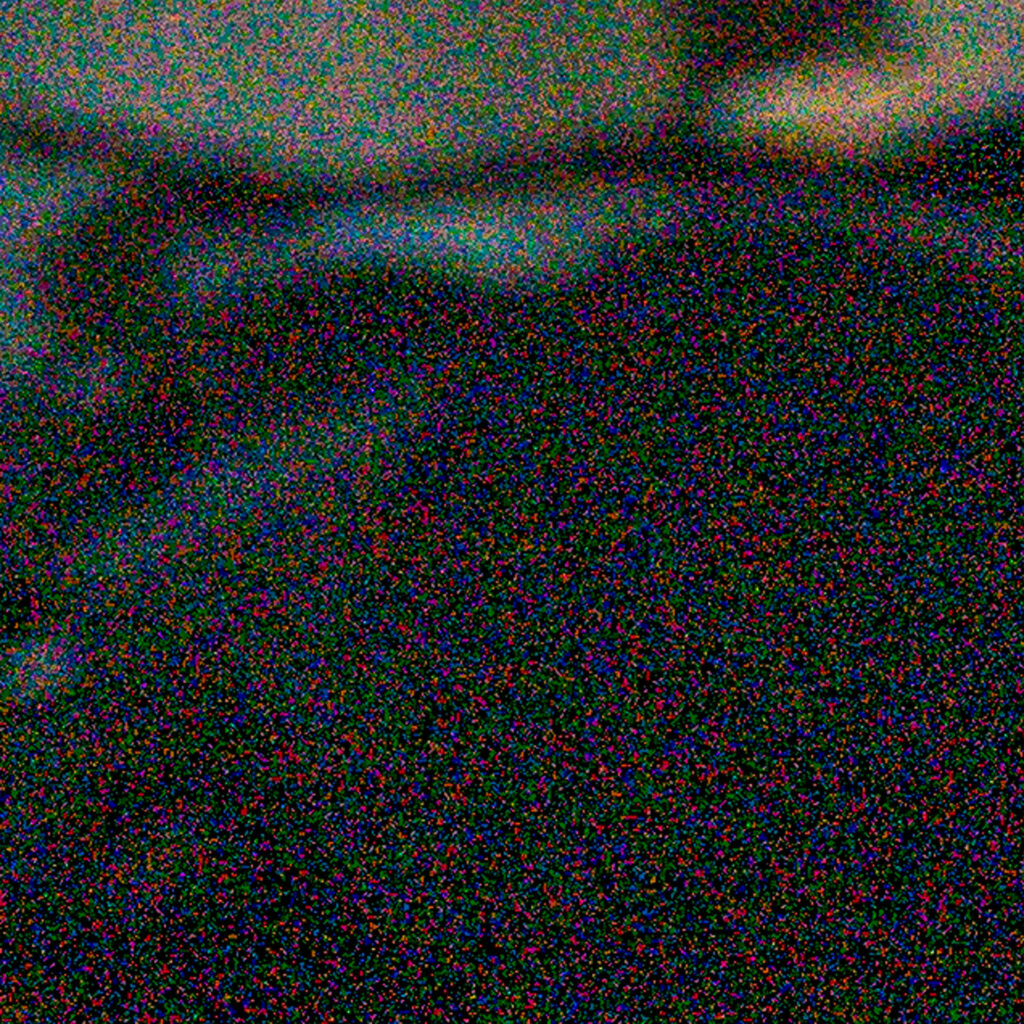
    Chromatic noise
    example of Chromatic Noise I

    Chromatic noise is also called Colour Noise. You can recognise it by the distinct colour specks appearing across your photo. Chroma noise is most visible in underexposed or shadow parts of your image. If you’re dealing with a nighttime image like a stars cape or aurora borealis, you’ll often see a lot of colour noise. In Topaz Denoise, there is a special mode for images like this called low-light mode. Special care has been given so it does not eat stars in your starscapes.

    For more ‘normal’ types of colour noise, the ‘Color Noise Reduction’ slider is more than enough.

    Sharpen and recover detail

    You’ll also find a ‘sharpen’ slider and a ‘recover detail’ slider. The best procedure is to first dial in your noise reduction. Then toggle between the before and the process preview. If you see any apparent reduction, dial it back in with the ‘recover detail’ slider. If beyond that, you want to add more sharpness to your image, use the ‘sharpness’ slider.

    Top tab: Masking and Brighten

    Topaz Denoise Ai top bar

    When you look at the top of the ‘Denoise AI’ interface, you’ll notice a tab with Masking, Original, View and Brighten.

    The ‘Original’ button will show your unprocessed image in the preview window, ‘View’ allows you to toggle between a before/after split style preview window or a full version. Basic stuff, really. The ‘Masking’ button might leave you more puzzled, but it is what you think it is. Topaz ‘Denoise AI’ allows you to draw a mask on your image, excluding parts of it from being processed. They also implement the same idea is in ‘Sharpen Ai'(check my review) where I go into more detail on this functionality.

    [bafis_image before_img=”https://www.wimarys.com/wp-content/uploads/2020/06/denoise-AI-black-6400-before.jpg” after_img=”https://www.wimarys.com/wp-content/uploads/2020/06/denoise-AI-black-6400-after.jpg” orientation=”horizontal” offset=”0.5″ before_label=”ISO 6400 night noise before” after_label=”ISO 6400 night noise after”]

    The ‘Brighten’ functionality is also an interesting feature. Let me explain. it’s recommended to start your workflow with ‘Denoise AI’. Since you might have a RAW image that is slightly underexposed, or with deep dark shadows, this ‘Brighten’ button virtually turns on the lights for you. This allows you to better see the noise in your image and select more appropriate levels of noise reduction for further editing. This prevents you from having to go back to noise reduction after raising shadows or adding exposure later on.

    Save image and export options

    The last stage of processing is the export tab. If you’re using the Topaz ‘Denoise AI’ plug-in, you press ‘apply’ to process and return to Photoshop. The standalone version has a few more options. You can export as a PNG, TIFF, JPG or DNG file. You can also reduce the quality of the image for a smaller file, change the filename, export directory and color profile. It’s always best to keep your files in a wide color profile like Prophoto RGB, unless saving JPG for the web. Choose sRGB for that or you might get some freaky colours in your browser.

    Conclusion

    Digital sensors have evolved massively in the last 2 decades. Unfortunately, in-body noise reduction has not and we are still stuck with algorithms that measure noise at pixel level and apply the same noise reduction to every pixel. Luckily machine learning is giving us more options, at least on your desktop. One of those applications driven by machine learning is Topaz ‘Denoise AI’. This denoise plug-in for Photoshop has learnt (and is still learning) what noise is, which type of noise is present and how best to reduce it to get a clear and natural looking noise free image. There are after all times where it’s needed to raise the ISO (and unfortunately add noise) for nighttime photography or fast action. Also, the trend for higher megapixel cameras also result in more noise in the image, especially at higher ISO levels.

    [bafis_image before_img=”https://www.wimarys.com/wp-content/uploads/2020/06/ISO12800-dawn-fox-before.jpg” after_img=”https://www.wimarys.com/wp-content/uploads/2020/06/ISO12800-dawn-fox-after.jpg” orientation=”horizontal” offset=”0.5″ before_label=”ISO 12800 low light mode before” after_label=”ISO 12800 low light mode after”]

    The hard question is whether Topaz ‘Denoise AI’ is worth it. Is it better than Lightroom or Photoshop Denoise? Well, if you know exactly what you’re doing in Photoshop, it’s possible to get very close to the results you can get with Topaz ‘Denoise AI’. However, any solution other than serious Photoshop layer processing won’t have the same consistent quality output that ‘Denoise AI’ has. The automatic detection settings have also worked very well for me, and I prefer to add some sharpening in ‘Denoise AI’ over using other methods later on in my processing chain. I just feel that it looks more natural this way.

    If you’re looking for just one Topaz labs machine learning plugin, ‘Denoise AI’ would be my choice.

  • Topaz JPEG to RAW AI review

    JPEG to RAW AI review

    Introduction

    With artificial intelligence being used in image editing software, it’s an interesting time for photographers. Topaz labs is on the forefront of machine learning with several unique and interesting apps on sale and in development. ‘JPEG to RAW AI‘ is one of these applications, designed to enhance your Jpeg files for further, RAW-style processing. 

    What does JPEG to RAW AI do

    ‘JPEG to RAW AI’ claims to extract enough data from a decent jpeg file so you’ll be able to process it in the same play as camera raw file. It’s uses machine-learning to convert a jpeg into a high-quality RAW file for better editing. ‘JPEG to RAW AI’ claims to remedy typical Jpeg processing problems like compression artifacts, banding, loss of details and narrow dynamic range. If you’ve ever used JPEG files as a base for advanced processing in Photoshop, you’ll have run into problems with dynamic range and a lack of color detail. SO this looks on the surface like a worthwhile app for your collection. Let’s investigate a bit further.

    How does JPEG to RAW AI work?

    Recover lost dynamic range and detail

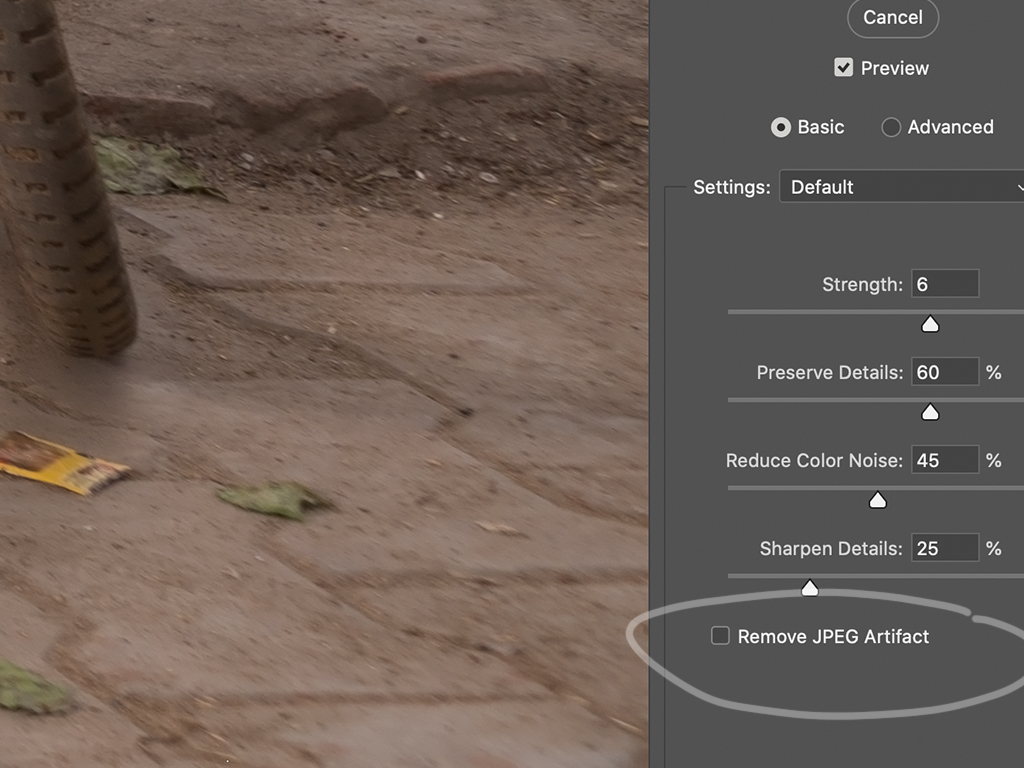
    Images lose significant dynamic range when converted to jpeg. And I’ve had great difficulty in the past to recover lost detail from jpegs. In Photoshop, there is also a ‘Remove JPEG Artifact’ inside the reduce noise window, but results vary. 

    Remove Jpeg Artefact Photoshop

    ‘JPEG to RAW AI’ claims that while it is not possible to recover all missing details, it can work with even tiny amounts of information. Thanks to this created information, you can be more aggressive when adding or removing exposure and contrast. This can be handy if you have a blown out sky or an underexposed subject.Jpeg To Raw Ai preview window

    Recovering details

    It’s inherent that’s during jpeg compression a lot of detail will be smoothed out. Pictures taken with an iPhone are also heavily compressed to save storage space. I can recover a lot of image detail with ‘JPEG to RAW AI’.

    Recovering lost color information

    SRGB vs Prophoto RGB

    We save jpeg images in the sRGB color space. This is fine for use on websites, but when editing a photo and adjusting saturation or Vibrance will often see ugly color artifacts. ‘JPEG to RAW AI’ can expand this limited color space to Prophoto RGB, which is even Superior to regular raw file. This is possible because there is enough information in at least one of the color channels. Using this information, the machine learning algorithm can reconstruct missing color detail with a good level of accuracy. This all benefits you when adjusting your images Vibrance and Saturation in your image editor of choice, seeing no artifacts.

    Color Depth

    Bit depth or color depth is the amount of color information an image can store. You might have noticed that when you try to edit an image with low bit depth, color banding will appear in the sky. It’s also what often happens when you upload a photo to Facebook, by the way.

    A normal 8-Bit jpeg file has 265 values per channel. When ‘JPEG to RAW AI’ has processed your Jpeg, it will have expanded this figure to over 65,000 per channel.

    This will eliminate banding problems when editing your images for good.

    Other artefacts

    We are all used to seeing visible compression artifacts in jpeg images that are compressed. ‘JPEG to RAW AI’ can also help with this issue. It will remove these artifacts, even invisible ones in high-quality JPEG files.

    Interface and workflow

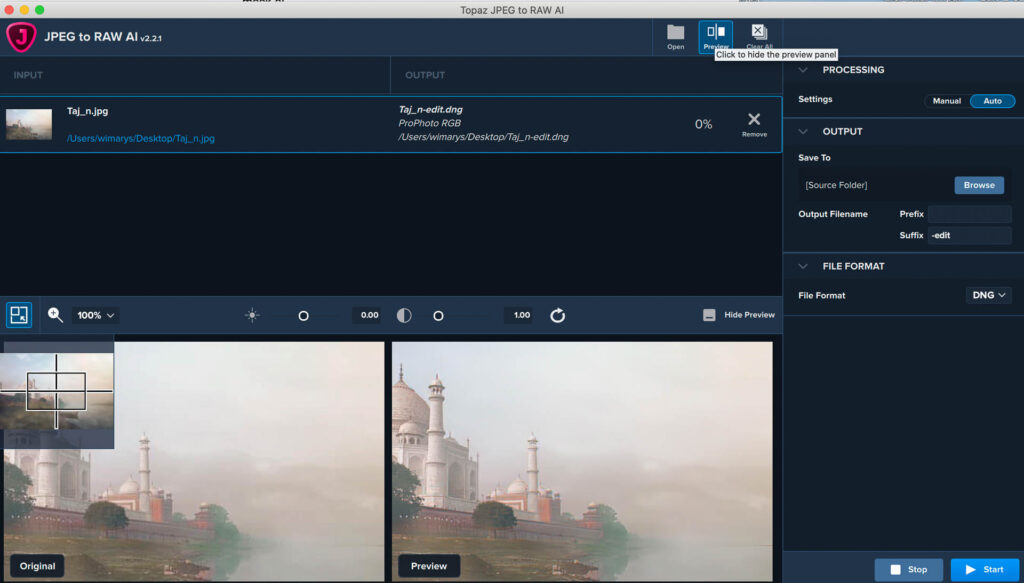
    Jpeg To Raw interface

    Importing images

    Single image processing

    To get started, click open to import your image into ‘JPEG to RAW AI’. You can also drag and drop your image from the desktop or folder of chores for convenience.

    Multiple image processing

    To get started, open and select multiple images to import into the application. You can also drag-and-drop folder of images from the desktop or folder of choice to begin your workflow.

    Processing window

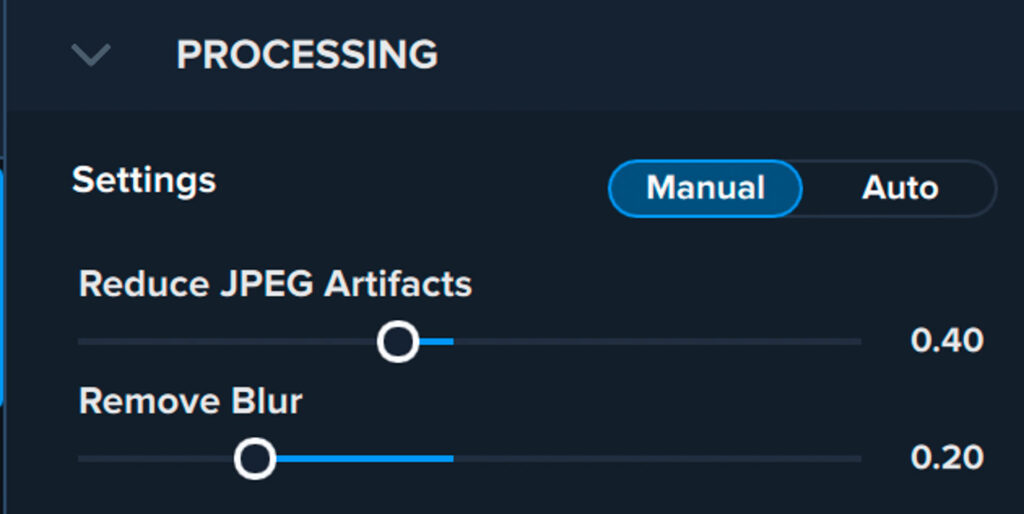
    You can decide between manual or automatic processing. Automatic choses appropriate settings to enhance your image. If you’re not pleased with the output file, I would suggest coming back and tinkering with the sliders yourself.

    Jpeg To Raw Ai processing window

    In the manual processing window, you’ll see 2 sliders. They call the first one ‘reduce jpeg artifacts’. The second one is the remove blur slider.
    Reduce jpeg artifacts
    Adjust ’reduce jpeg artifacts’ slider according to the noise level of your image. Noisier images may need to use a higher volume.
    Remove blur
    Adjust the remove blur slider according to the blur level of your image. Images may need to use a higher value.

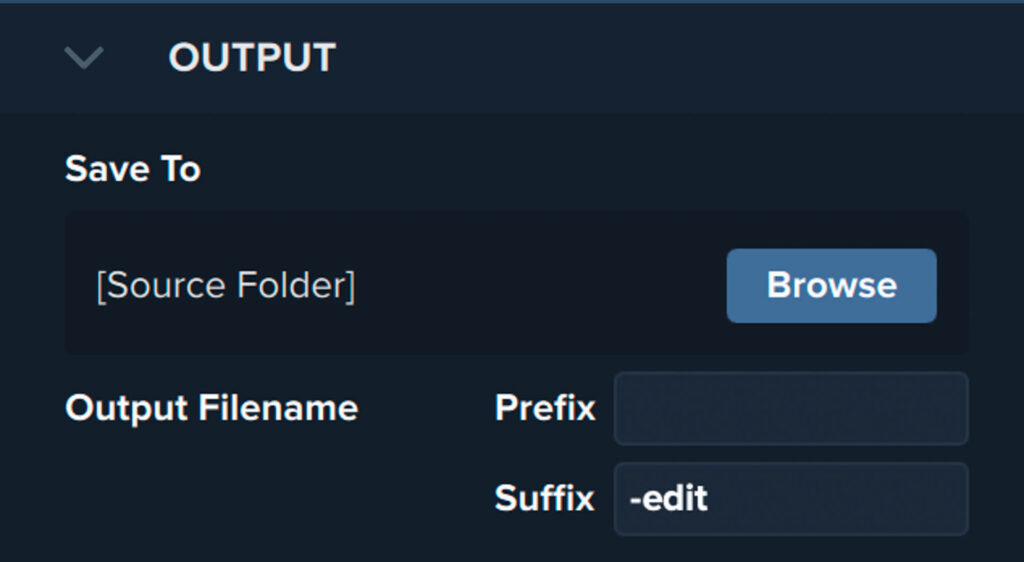
    output settings

    Jpeg To Raw Ai output settings

    In the output settings, you can select where you’d like to save your processed image. It can save this image to either the location of the source image, or a custom folder. When using a custom output location, a browse button appears.
    Output file name prefix / suffix
    It will base the output file name on the source filename. You can add a prefix and or a suffix to create a unique output file name.

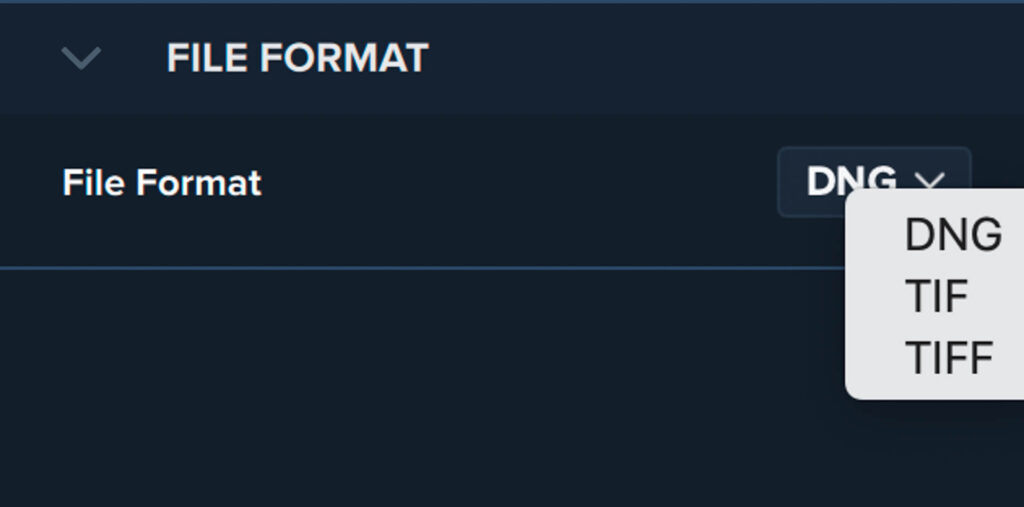
    Jpeg To Raw Ai file export settings

    You can decide between DNG, Tif and Tiff formats as output extensions.

    JPEG to RAW AI user experience

    I love to travel for my photography. During a trip to India we visited the Taj Mahal. I found a fantastic and unusual view of the Taj Mahal from the banks of the Yamuna River. I got a couple of nice shots and transferred one as a jpeg to my phone. The next day, in the freakish formatting accident, I deleted all my raw files.

    When I got home, I tried to fiddle around with the one jpeg I saved but never got anywhere. When I noticed that topaz labs released the software, I thought this would be an excellent case to test it.

    The procedure itself is simple. You import your jpeg into ‘JPEG to RAW AI’, and heater select Auto or manual processing. I went for automatic processing and saved my output file as a DNG. My entire Lightroom catalog now comprises DNG’s  since I’m now also compressing my raw files with an application called Rawsie. This keeps the size of all of my years of pictures manageable.
    Anyway, once I aborted the new file into Lightroom, I could no longer tell the difference between my raw files and this convert to jpg.

    [bafis_image before_img=”https://www.wimarys.com/wp-content/uploads/2020/06/JpegToRAWbefore.jpg” after_img=”https://www.wimarys.com/wp-content/uploads/2020/06/JPegToRAWAfterjpg.jpg” orientation=”horizontal” offset=”0.5″ before_label=”Before” after_label=”After”]

    I must admit but I do always save my J packs in the highest quality too, but even still I was amazed with the transformation. I could pull out the shadows seeing no artefacts and darken highlights just as I would have been able to do with a 42 MP raw file., I’ve been researching a lot of color theory and love to implement this in my workflow too. this means a lot of fiddling with colors, changing vibrance, lightness and saturation. Again, I was not disappointed with the ‘JPEG to RAW AI’ file. Everything felt natural and easily manipulated.

    Conclusion

    If you’ve been shooting jpegs for years and discovered the advantages Raw files, ‘JPEG to RAW AI’ can be a significant help for you. Another use is, if, like me, you’ve lost a bunch of RAW files but recovered the jpegs. Here, you’ll find this app very useful too. 

    With an excellent quality jpeg I could use ‘JPEG to RAW AI’ to extract missing detail, dynamic range and color information and save it as a DNG file. I could use this file and manipulated and Photoshop in the same way as I would have been able to do with the original raw file. I should also note that much depends on the quality of your input Jpeg. If it’s already a small and compressed file, ‘JPEG to RAW AI’ won’t be able to recover as much information as when you have a large file to start from. So it’s important to keep your expectations realistic.

    [bafis_image before_img=”https://www.wimarys.com/wp-content/uploads/2020/06/JPEG-TO-RAW-AI-before1.jpg” after_img=”https://www.wimarys.com/wp-content/uploads/2020/06/JPEG-to-RAW-AI-after1.jpg” orientation=”horizontal” offset=”0.5″ before_label=”original Jpeg” after_label=”DNG +3 exposure in camera RAW”]

    If however you are determined to make the best of the legacy files you still have in your library, this $99 will be the best money you’ve ever spent. The only disadvantage being that you’ll only need to use it once to convert your image Library. Unless you want to continue shooting JPG to save space but now and again need a file that can handle a lot more editing.

  • Pixlr review

    Pixlr review

    Introduction

    Pixlr image editor is a Photoshop-like application for image editing.  The most striking difference is that this is an Saas software. Saas stands for software-as-a-service and is a relatively new term, especially for image editors. It’s basically an application that runs in the cloud, this offers several advantages for the software developer and the user. Since the software isn’t using the processing power of your computer, but runs on processing power in in the cloud, there are no problems with hardware compatibility. And for the manufacturer, pirating is of course not possible since the application isn’t running on your computer.

    How Does it work?

    I’ll be going over all the features in this Pixlr review. You’ll always needs to use a browser to access Pixlr.  into your account. Your browser of choice should be Google Chrome as they offer as Google offers the most open sourced infrastructure. this is in fact the reverse on how Adobe Creative Cloud works where they want you to store your data in the cloud and use an application on your computer. . Instead, Pixlr will store your images on your computer and the processing happens in the cloud.

    There are 2 versions of the software:

    • Pixlr X is more easy to use for beginners and for quick edits. It’s easy to master and features lots of artistic effect presets.
    • Pixlr E is a more powerful image editor for professionals. The interface looks a lot like photoshop with all the pro tool’s you’d expect.

    Pixlr E interface

    Pixlr interface

    Left hand tool tab

    You’ll find the tool tab on your left hand side. Similar to photoshop, there is a nice selection of tools available in the Pixlr E version. Lets have a look at all the tools and functions from top to bottom.

    Pixlr Left hand tool tab

    • Arrange tool: It’s possible to move, transform and change layer settings.Your layer is first locked into place so you need to unlock them to use the arrange tool to move them. It’s also possible to copy your background layer just like you would do when layering in Photoshop.
      Marquee select tool: You can create selections with the square and circle selection tool. there are 3 modes available. First notice new selection then it’s add to selection by pressing shift and the last notice removed from selection by pressing control. there is also a feather Ranger available ranging from 0 to 100 and the anti-alias switch.
    • Lasso select tool: You can use the freehand, polygon, busier or magic lasso to create a selection. There are 3 modes available: new selection, add to selection by pressing shift and remove from selection by pressing the Ctrl button.
    • Wand select tool: You can use the magic wants to select areas with similar colors. New selection, add to selection by pressing shift and remove from selection by pressing the Ctrl button are available. You can set a tolerance and feather ranging from 0 to 100. You can also sample from the current layer or all layers. Also here and anti-alias is selectable.
    • Crop tool: You can trim, cut and straighten the canvas by free or fixed aspect. you can use a free constraint, a ratio or a size. It’s also possible to straighten your image here.
    • Cutout/Mask tool: You can mask areas and or remove backgrounds, cut out object or crop / trim individual layers. It’s possible to engage the artificial intelligence Engine air and automatically allow the system to select the range of similar color or Texture. The tools available to you are magic mask, shape mask, drawing mask, lasso mask and gradient mask. You can choose between add to mask mode and remove from ask mode to add or remove parts of your selection.
    • Liquify tool: You can grow, shrink and push parts of the image. Use liquify to make subtle adjustments to portraits and other images. There are 6 methods available. If you’re a Photoshop user, they will be familiar to you. They’re called push, and large, shrink, swirl right, swirl left and restore.
    • Heal tool: This tool is used to remove spots, unwanted objects, blemishes and clean up images. There are two methods available the patch method and the infield method. You can also choose the size of the brush.
    • Clone tool: Draw and copy from another area in an image. You need to first select Source Point and then paint over the areas you want to change.
    • Blur/sharpen/smudge tool: This allows you to draw over areas in the image to sharpen blur or smudge details. A brush sizes selectable as well as a brush strength.
    • Dodge/burn: Lighten or darken areas of the image to bring out dark areas or dim light ones. You can select the range of tones between shadows, midtones and highlights. Again, brush size and strength can be changed.
    • Sponge/color tool: Brush Vibrance, saturation n or temperature in local areas to pop or reduce colors. I wouldn’t call this a professional tool but it’s definitely fun to use. there are three methods: Vibrance, saturation and temperature. Brush size and strength selectable.
    • Pen tool: Use distinct types of creative pens like web, crayons, ink and tail to doodle and draw. Similar to the pen tool in Photoshop but with a bit more variety of built-in styles like sketch, parallel, trail, shaded, furry, crayon and ink. Options for your pen type are size, amount and opacity.
    • Draw tool: You can draw and doodle with different brushes and colors. This is like the brush tool in Photoshop.
    • Eraser tool: You can erase parts of an image with a brush. Pixlr advises you to  use the cutout tool for a more fine result. You can switch between the hard tip and soft tip brush. Opacity and brush size are individually selectable.
    • Color replace tool: It’s possible to change one color in an area to another by drawing over that color.
    • Fill tool: You can fill whole areas with a single color similar to the bucket tool in Photoshop.
    • Gradient tool: The gradient tool creates blends with different colors and transparencies. The possibilities here are endless and depend on what exactly you want to do. you can choose between a linear and Radial type of gradient.
    • Shape tool: you can draw different shapes like squares circles and lines with this tool.You can even draw hearts if you would want to do that.
    • Text tool: You can add a new text layer or use one of the pixlr templates with this tool.
    • Picker tool: Identical to the eyedropper tool in Photoshop, this tool allows you to pick colors from the image to use with other tools. Different color schemes like triadic, tetradic, analogeous and complementary are care available. This is a pretty cool feature.
    • Zoom tool: you can zoom in and out to focus on different parts of your image with this tool.
    • Hand/pan tool:  You can move the viewable area when the image is zoomed in. This feature is always selectable by pressing the spacebar.
    • Switch colors: Like in photoshop, switch between black and white brush colors here.

    Top bar tools

    Pixlr Review 3

    File tab:

    • New image: Create a blank document.
    • Open image: Open a new image from your Mac or PC.
    • Open image URL: Open an image from a URL.
    • Stock search: Search the included pixlr stock photo Library.
    • Browse elements: Elements include overlays borders shapes and stickers. These can be added to your document and layered.
    • Save: save your image.
    • Print: print your image.

    Edit tab:

    • Undo: undo your last action.
    • Redo: redo your last action.
    • cut: cut your selection.
    • Copy: copy your selection.
    • Clear: clear the selection.
    • Paste: paste the selection.
      Free transform: stretch your image unconstrained.
    • Free distort stretch and shape your image unconstrained.
    • Transform: rotate your image to the left or to the right and flip your image horizontally or vertically.
    • Stroke: add an outline to your image.
    • Fill: fill your image with a color and possibly select a blend mode and opacity.

    Image tab:

    • Image size: change the width and height of your image
    • Canvas size: edit the dimensions of your canvas. You can use an anchor point and select relative change or not.
    • Image rotation: you can rotate your image to the left to the right and flip it horizontally or vertically.
    • Crop: crop the image.
    • Trim: trim excess parts of your image.

    Layer tab:

    • New layer: make a new layer.
    • Duplicate layer: duplicate the current layer.
    • Add image as layer: select a new image from your PC and added as a new layer.
    • Add element layer: at one of the built-in elements as a layer.
    • Add URL as a layer: add an image from URL as a layer.
    • Delete layer: delete the currently selected layer.
    • Rasterize a text or element.
    • Merge down: merge all layers down from the selected layer.
    • Merge visible: merch all visible layers.
    • Flatten image: flatten all layers into the background layer.
    • Bring forward-up: bring the selected layer one place up the layer tree.
    • Send backward-down: send the selected player one-place down the layer tree.
    • AI Auto mask: used Pixlr proprietary Auto masking technology to select the subject mask.
    • Add mask: add a mask to your image.
    • Apply mask: apply your selection as a mask to your image.
    • Remove mask: remove your current mask from your image.
    • More mask: invert mask, extract mask, layer and convert mask to selection.

    Select tab:

    • Select all: select your entire canvas.
    • Select pixels: select the pixels from your selection.
    • Deselect: deselect your current selection.
    • Invert selection: invert the current selection.
    • Convert to mask: convert your current selection to a mask.
    • Save selection: save your current selection.
    • Restore selection: restore the last state of the selection.

    Adjustment tab:

    • Auto adjust: allow the software to auto adjust exposure, color, gamma, brightness and saturation.
    • Brightness and contrast: change the brightness and contrast of your image according to your own preferences.
    • Temperature and tint: adjust the temperature and tint of your image for a more natural appearance.
    • Hue and saturation: adjust a hue and saturation of your image.
    • Vibrance: adjust the vibrance of your image.
    • Color Balance: change the color balance of your image.
    • Colour lookup: apply a lookup table to your image not
    • Highlights and shadows: change the dynamic range of the highlights and shadows in your image.
    • Exposure: change the overall exposure of your image.
    • Curves: adjust the dynamic range love your image with curves.
    • Levels: adjust a dynamic range of the shadows, mid-tones and highlights of your image using the levels tool.
    • Threshold: set the threshold of the selection from your image.
    • Posterize: apply a posterize effect.
    • Desaturate: equalize the desaturation in your image.
    • Invert: invert black and whites.

    Filter tab

    • Effects Library: you’ll find many Instagram Style effects and this tab. These are all easily accessible and straightforward.
    • Details: the details tab it’s where you need to go if you want to sharpen, clarify, blur, gausian blur, zoom blur, smooth, grain, add noise and remove noise.
    • Vignette: apply darkening of your canvas edges here.
    • Bloom: this creates an overall lofi brighter effect.
    • Glamour: adds a glow to the lighter areas of the photo
    • Dehaze: reduce the amount of haze because of meteorological conditions like mist, fog, excess sunlight and air polution
    • Inner Glow: add an inner glow effect to your selection.
    • Outer Glow: add an outer glow effect to your selection.
    • Outline: create an outline on clear edges in your photo
    • Drop Shadow: create a drop shadow effect in your photo.
    • Fringe: similar to outline, create an outline effect around edges.
    • Pixelate: Create a pixelated effect .
    • Mosaic: Create a mosiac style effect.
    • Halftone: Quickly create a halftone style effect.

    View tab

    • Zoom in: zoom into specific parts of your image.
    • Zoom out: zoom out of that specific Parts in your image.
    • Fit screen: fits your entire canvas to the screen.
    • Fill screen: fill your entire screen with your image.
    • 100%: view your image at 100% magnification.
    • 200%: view your image at 200% magnification.
    • 300%: view your image at 300% magnification.
    • Toggle full screen: toggle between the last state and full screen.
    • Toggle light and dark mode: toggle between a darker and lighter interface.

    Help

    • Keyboard shortcuts: view a list of keyboard shortcuts.
    • Get help: a shortcut to the Pixlr forum.
    • Our YouTube tutorials: a link to the Pixlr YouTube tutorials Dot’s
    • Our Instagram: go to their Instagram account.
    • Our  Facebook: go to their Facebook account.
    • Color matcher: go to the designs AI color palettes and wheels products.
    • Font matcher: go to the designs.ai artificial intelligence font matching machine.

    Conclusion

    Pixlr has a  large number of tools that will help you professionally process your images. There are many easy effects available straight from the interface. It’s also possible to create graphics for advertisements, social media, logos and business cards. You don’t need an ultrafast processor and vast amounts of memory either. You can use it straight in your browser of choice, and your licence is valid on any computer. The major disadvantage is the Pixlr only works with jpeg’s and does not support RAW, TIFF and DNG’s.

    For the novice user, the UI can be confusing however. Some of the functions can be difficult to understand if you don’t have a background in Photoshop or similar software. It would also be nice if the interface would provide more feedback on what functions are currently active. But there is also a positive side in that Pixlr allows a beginner the chance to experiment with advanced functions. Many of these only available in premium graphics software.

    Overall, I would recommend Pixlr to anyone who wants a cloud-based editing tool. It’s not as refined or feature rich as the more expensive desktop applications like photoshop, but you can use it from anywhere, on any computer and at much lower cost.