How to Install and Use LUTs on Sony Cameras: Step-by-Step Guide
Sony’s recent camera models have introduced the ability to use custom LUTs (Look-Up Tables), a game-changing feature for previewing footage in-camera. This guide walks you through the steps of installing and using LUTs on compatible Sony cameras, ensuring you capture exactly what you envision without extensive post-production adjustments. Follow our step-by-step guide to elevate your workflow with custom LUTs on models like the a6700, FX3, FX30, and others.
Step 1: Prepare Your Files
- Choose Your LUTs: Start by selecting the LUT files you want to use, ideally saved as
.cubefiles, which Sony cameras accept. - Organise on Your Computer: Ensure these LUT files are properly named and accessible from your computer to simplify the transfer process.
Step 2: Set Up Your SD Card
- Insert and Format: Insert the SD card into your camera and format it (if it isn’t already). This ensures compatibility and prevents errors during the installation process.
- Create Folders (if needed): On your computer, navigate to the SD card. If your card doesn’t have a specific Sony folder structure, create it as follows:
- Go to
PRIVATE > SONY > PRO > L. This path is essential for Sony cameras to recognize your LUT files.
- Go to
Step 3: Transfer LUTs to Your SD Card
- Move Your LUT Files: Drag and drop the
.cubeLUT files into theLfolder. - Safely Eject the SD Card: Ensure you safely eject the card from your computer to avoid any data corruption.

Step 4: Install LUTs on Your Sony Camera
- Insert SD Card into Camera: Place the SD card back into your camera.
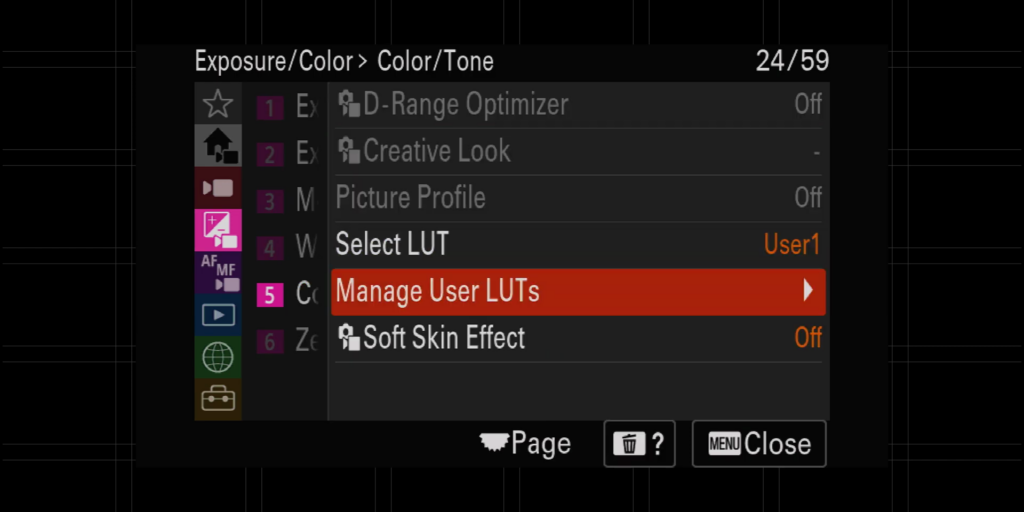
- Navigate to Settings:
- Go to the Menu and select Tab 4 (Exposure/Color).
- Choose Manage User LUTs.
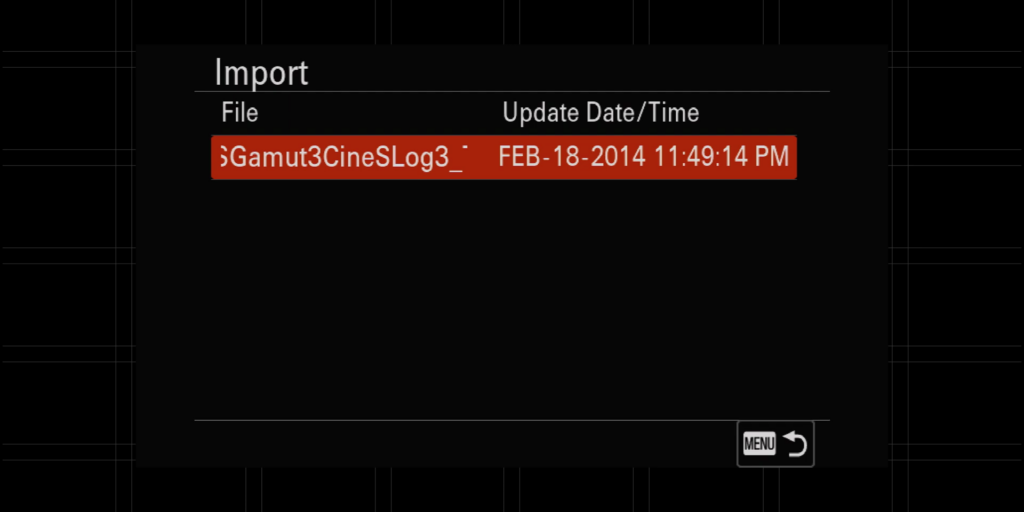
- Import LUTs:
- Select an available user slot and import your chosen LUT. Once the import is complete, your LUT is now saved to the camera and accessible without the SD card.

Step 5: Activate and Preview LUTs on Sony Cameras
- Enable Log Shooting:
- In the Menu, go to Tab 3 (Shooting/Quality).
- Select Log Shooting Settings and turn it On.
- Select Color Gamut: Match the color gamut (such as S-Gamut3.Cine) to the LUT you’re using to ensure the preview looks accurate.
- Preview LUT:
- Return to Tab 4 > Color/Tone > Select LUT. Choose the LUT you imported to see a preview of your footage with the LUT applied.
Common Issues and Troubleshooting
Problem: “File Cannot Be Loaded” Error
Solution: Resize your LUT file in Photoshop by following these steps:
- Open a new 3840×2160 file in Photoshop.
- Go to Image > Adjustments > Color Lookup and load your LUT.
- Export it with medium grid points, save, and try importing it again.
Problem: LUT Not Displaying Correctly
Solution: Ensure you’re using compatible settings (e.g., Log Shooting mode) and that the color gamut matches the LUT requirements.
Tips for Getting the Most Out of LUTs
- Adjust Exposure and White Balance: For the best results, set your exposure and white balance according to the preview in-camera. This minimises adjustments in post-production.
- Keep a Few LUTs Handy: Experiment with different LUTs and keep a selection available on your camera for varying lighting conditions and styles.
- Know Your Camera’s Limitations: Sony’s LUT feature doesn’t apply to footage directly but allows you to see a preview, so be prepared to apply the LUT in post for final editing.
FAQ
Q: Do I need an SD card to use LUTs on my Sony camera?
A: You need the SD card initially to import LUTs, but once they’re loaded onto the camera, they remain accessible even without the card.
Q: What file format should my LUTs be in?
A: Use .cube files, as Sony cameras recognise this format.
Q: Can I use multiple LUTs simultaneously?
A: No, Sony currently allows only one LUT at a time.
Q: Do I have to use Log Shooting to apply a LUT preview?
A: Yes, Log Shooting mode must be enabled to preview LUTs in-camera.
Q: Will my footage be affected by the LUT applied in-camera?
A: No, the LUT is only for preview purposes; it won’t alter the recorded footage directly.
Using LUTs on your Sony camera can streamline your shooting process, providing a clear visual reference that helps achieve your desired look. With a few simple steps, you’ll be ready to elevate your projects and save time in post-production.


0 Comments